

The Pinterest Challenge was started by Katie Bower of Bower Power and Sherry Petersik of Young House Love. It is not affiliated with Pinterest it is just a fun challenge to get us all off our pinning hinnys and start doing the things we actually pin.
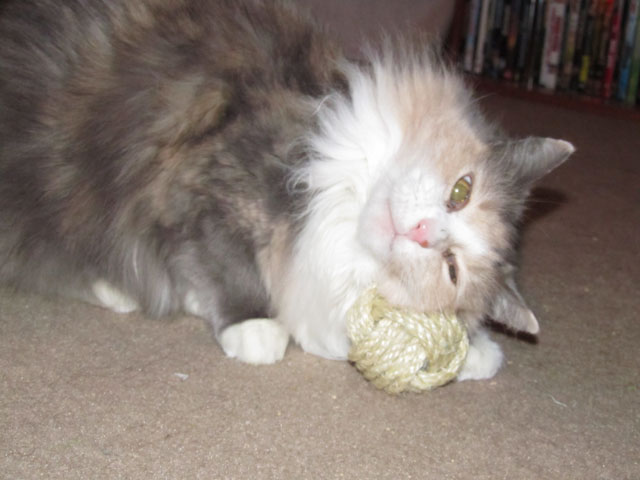
My first Pinterest Challenge was the Winter edition. I made a Monkey Fist for the cat's to use as a toy.
 |
| Source |
A large monogram wrapped in twine and decorated. I thought it was so pretty and I had most of the supplies on hand. I decided to use sisal instead of twine - though the twine probably would have been easier to use. The original pinner didn't have much of tutorial but that might be for two reasons.
- There really isn't much to it. You take your letter and wrap the rope around it and glue it down.
- There is so much glue that if you tried to take photos during each step your camera would be covered in glue. I was able to take some photos so you should be able to get the gist.
Supplies:
Material to make your letter - I had a piece of Styrofoam hanging around
Box Cutter, Ruler & Sharpie - All to make your letter
Sisal Rope - Still had plenty on hand from the first Pinterest Challenge
Glue - White glue and super glue
Decoration - I used fake flower and a fabric butterfly
Rubber bands
Now here are a few tips
- The original pinner said she use hot glue. I'm not sure how because from experience I've learned that hot glue melts Styrofoam.
- Super glue will also melt the Styrofoam - make sure you only use it to stick the rope to itself.
- The rubber bands were a big help when it came to holding the ends of the rope down while the glue dried. White glue takes a while to dry.
Step 1: Creating your letter

You can do this a couple ways. Freehand, Stenciled or measure it out. Since I was making an M, it was relatively easy to measure it out. All I had to do was find the center and decide how wide I wanted the tops and the feet. Because of the size I was making the overall piece it was really easy when it came time to make the sides. The width of the ruler was perfect so I just used that to draw my lines.


You can do this a couple ways. Freehand, Stenciled or measure it out. Since I was making an M, it was relatively easy to measure it out. All I had to do was find the center and decide how wide I wanted the tops and the feet. Because of the size I was making the overall piece it was really easy when it came time to make the sides. The width of the ruler was perfect so I just used that to draw my lines.
Step 2: Cutting out your letter
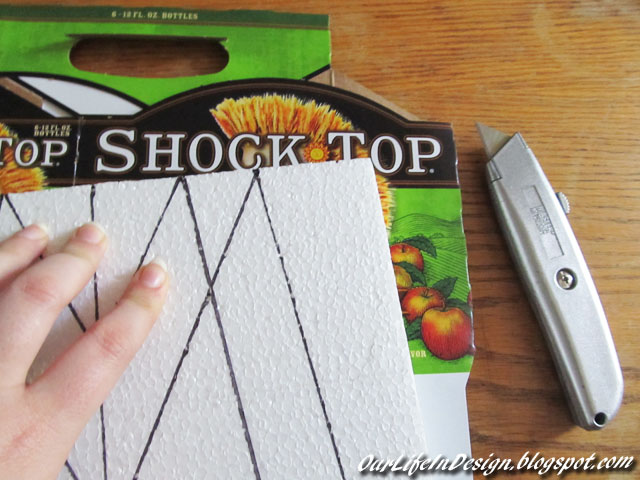
This is a little tricky. The blade on my box cutter wasn't long enough to go all the way through. Also, make sure you have something underneath to protect your surface you are cutting on. I just used a piece of cardboard from the recycle bag. That's right Shock Top Apple Wheat, Yummm.
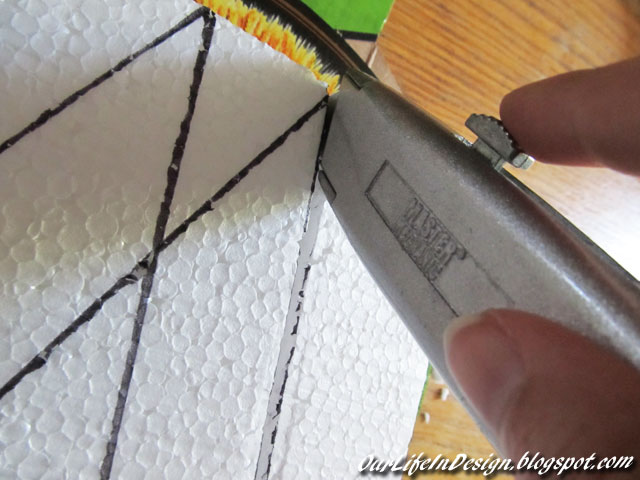
I also found that if you stick in the box cutter and pulled it to cut it kind of ripped the Styrofoam It worked better if I did a jabbing/sawing motion. To cut all the way through I found a butter knife did the job perfectly.
This is a little tricky. The blade on my box cutter wasn't long enough to go all the way through. Also, make sure you have something underneath to protect your surface you are cutting on. I just used a piece of cardboard from the recycle bag. That's right Shock Top Apple Wheat, Yummm.
I also found that if you stick in the box cutter and pulled it to cut it kind of ripped the Styrofoam It worked better if I did a jabbing/sawing motion. To cut all the way through I found a butter knife did the job perfectly.


I may have also realized when I started cutting this that I probably should have waited to vacuum the house after doing this instead of before. Oops.
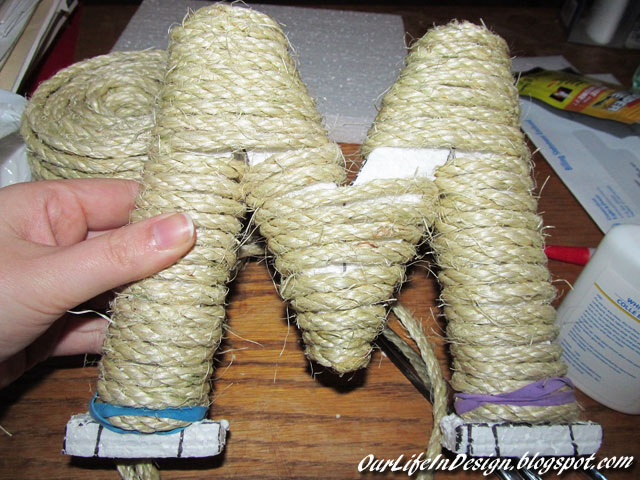
Step 3: Wrap It Up!
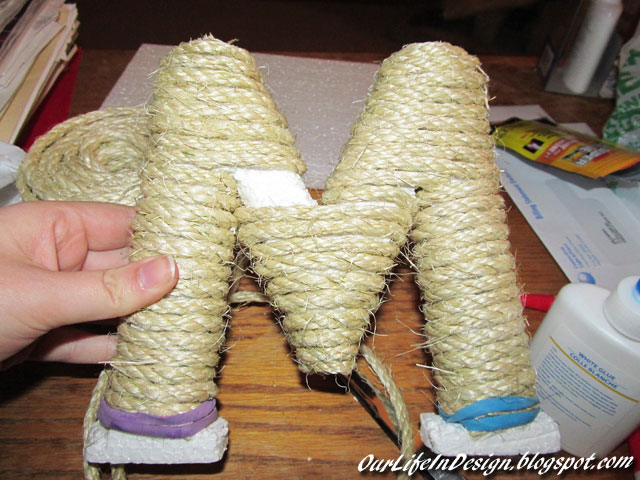
Wrap the rope around a section of the letter without glue first. That way you can cut a length of rope and it makes it a bit easier when wrapping and gluing it to not have it attached you a big roll. Some people may like to put glue on the whole letter but I didn't think it was necessary. I only glued the ends. Make sure you wrap that rope tight. The blue and purple things are rubber bands that I used to hold the rope in place while the glue dried.
 |
| Front of my M |
 |
| Back of my M - This doesn't have to look as good as the front. |
Wrap the rope around a section of the letter without glue first. That way you can cut a length of rope and it makes it a bit easier when wrapping and gluing it to not have it attached you a big roll. Some people may like to put glue on the whole letter but I didn't think it was necessary. I only glued the ends. Make sure you wrap that rope tight. The blue and purple things are rubber bands that I used to hold the rope in place while the glue dried.


Wrap and Glue. Wrap, wrap, wrap.............wrap.......glue. I did mine in 5 1/2 sections. Each side, the center up to one side, then I filled in up to the other side and lastly the two feet. The ends require the most glue to hold where the rope coils around itself.
Step 5: Decorate

I bought a sprig of fake flowers and another one with fabric butterflies. They were a dollar each at Dollar Tree. I also bought my white glue and super glue there. I cut the flowers down and tucked them in the corner made by the M and then added a butterfly. Then just add glue to hold everything in place. I had to let it dry upside down so the glue didn't drip all out.

If you want to you can cut a piece of rope and glue it to the back to create a hanger. Since our walls really suck I've been using a push pin and wedged it between the ropes on the back and that worked to hang it.


I also think it looks cute displayed on my Spring "Mantle". I made some fake nests with shredded paper that came in a basket. Then made some fabric flowers - I used the method found in both Ashley's (Attempts at Domestication) and Katie Bower's (Bower Power) tutorials. Add one of my favorite wedding photos, an owl and the My Town ornament of the sign at our wedding location and we have a great display. Plus it has all of my wedding colors - Sage, Ivory and Brown.


So did you take part in this Spring's Pinterest Challenge? Make sure you click over to the host's blogs and check out their projects as well as all the great projects everyone linked up.
I bought a sprig of fake flowers and another one with fabric butterflies. They were a dollar each at Dollar Tree. I also bought my white glue and super glue there. I cut the flowers down and tucked them in the corner made by the M and then added a butterfly. Then just add glue to hold everything in place. I had to let it dry upside down so the glue didn't drip all out.
If you want to you can cut a piece of rope and glue it to the back to create a hanger. Since our walls really suck I've been using a push pin and wedged it between the ropes on the back and that worked to hang it.
I also think it looks cute displayed on my Spring "Mantle". I made some fake nests with shredded paper that came in a basket. Then made some fabric flowers - I used the method found in both Ashley's (Attempts at Domestication) and Katie Bower's (Bower Power) tutorials. Add one of my favorite wedding photos, an owl and the My Town ornament of the sign at our wedding location and we have a great display. Plus it has all of my wedding colors - Sage, Ivory and Brown.
So did you take part in this Spring's Pinterest Challenge? Make sure you click over to the host's blogs and check out their projects as well as all the great projects everyone linked up.
- Emily from Sparkle meets Pop
- Renee from Red Bird Blue
- Sherry from Young House Love
- Katie from Bower Power
No comments:
Post a Comment